|
How to: Convert static display boats to RC OCTOBER 2002 ISSUE |
| by PAT TRITLE |
 |
1 •
2 |
 |
|

PAGE ONE OF TWO
Expanding your fleet is easier than you think
 Have you ever found just the right boat for your next project
only to realize that it wasn’t designed for RC operation? Well, why not
convert it to RC? Converting static-display boat kits is not difficult;
it’s simply a matter of planning and adding the necessary running
hardware. Boats of almost any size can be converted, but for your first
one, select one large enough to be equipped with off-the-shelf
components. Once you have a few conversions under your belt, you’ll be
able to convert just about any boat.
Have you ever found just the right boat for your next project
only to realize that it wasn’t designed for RC operation? Well, why not
convert it to RC? Converting static-display boat kits is not difficult;
it’s simply a matter of planning and adding the necessary running
hardware. Boats of almost any size can be converted, but for your first
one, select one large enough to be equipped with off-the-shelf
components. Once you have a few conversions under your belt, you’ll be
able to convert just about any boat.
When
you start your conversion, the one hard and fast rule is to plan. It’s
very easy to get ahead of yourself during construction. Before you
begin, read and study the plan and instructions, and sketch out your
strategy. Decide on the locations of the motor, speed control, drive
battery and rudder hook-up before you start construction. You’ll also
need to establish access hatches and know whether you need to make any
parts not supplied in the kit. With a game plan, the conversion will go
smoothly.
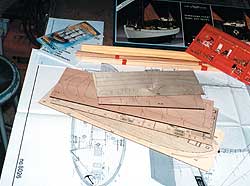
The boat I
selected for conversion is the Billings Mary Ann—a North Sea trawler.
The kit is 1/33 scale with an overall length of 21.6 inches and a beam
of 6.375 inches. It features plank-on-frame hull construction and comes
complete with fittings and detail parts. The Mary Ann kit is large
enough to convert easily, and it runs great.
The full-scale
Mary Ann was built in 1957. The boat’s overall length is 60 feet and
its beam is 17.55 feet. Power is provided by a 2-cylinder diesel engine
with a top speed of 12 knots.
|
SPECIFICATIONS |
Model: Billings Mary Ann (static)

Type: scale workboat
Length: 21.6 in.
Beam: 6.3 in.
Power: Graupner S-280 motor with Great Planes Electrifly C-20 ESC
Battery: 6-cell 600mAh
|
Duration: approx. 2 hr.
Radio req’d: 2-channel
Comments: converting static display boat models for RC operation
is an easy way to expand your fleet. Many display kits are ideal
candidates for conversion. Study the plan and instructions; planning
the equipment layout is the key to success.
|
REQUIRED COMPONENTS
For
the conversion, you’ll need a Graupner 7.2V S-280 motor, an electronic
speed control (ESC) with BEC (battery eliminator circuit), a
sub-microservo to control the rudder and a surface-frequency radio.
Because of the limited space in the hull, I used a Great Planes
ElectriFly C-20 10A ESC. The running system draws less than 1 amp of
current, but because there’s little cooling air inside the hull, I
wanted an ESC large enough to ensure that cooling it would not be a
problem. I used the kit-provided prop and prop shaft and coupled them
to the motor with a 1-inch-long piece of Robart air hose. I secured the
prop shaft to the motor with small zip-ties. A 6-cell 600AE battery
provides power to run the boat for nearly two hours.
 |
 |
|
Left: The kit content is very comprehensive and includes many brass fittings.
Right: To
accommodate the radio equipment in the hull, I added a shelf of
3/32-inch balsa. Note the hook-and-loop fastener to which the ESC will
be attached.
|
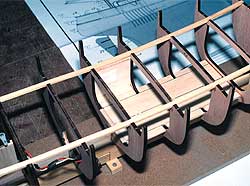
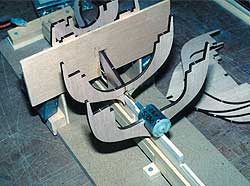
BUILDING THE MODEL
Following the plan, I marked and cut the keel for the stuffing box at
the proper angle. Once I had cut the keel, I epoxied the stuffing box
into place with 5-minute epoxy. Next, I located the required holes in
the formers for the motor and prop shaft, and I added balsa shims under
the motor for additional support. Once I had properly lined everything
up, I glued the formers into place and permanently installed the motor
and prop-shaft coupler. I used household Goop to glue the motor into
place.
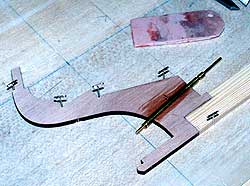
I made the
equipment trays and servo mount out of 3/32-inch balsa, glued them into
the hull and installed the rudder servo. I then glued 1/16-inch plywood
doublers to both sides of the keel between formers 9 and 10, and I
drilled an 1/8-inch-diameter hole for the rudder tube. I made the
rudder-control horn of 1/32-inch plywood and epoxied it to a 3/32-inch
wheel collar. I also made the rudder shaft out of 3/32-inch-diameter
brass wire and made the pushrod of 1/32-inch music wire. Then I aligned
the whole system and glued the rudder tube into the keel. I also
shortened the rudder-servo lead to avoid having a large bundle of wires
in the hull.
I then soldered
the ESC to the motor and tested the system. Make sure that the rudder
is centered and that the motor runs in the proper direction. Once
you’re satisfied that everything works properly, you’re ready to finish
the hull. Start by test-fitting the deck and making the access hatch.
Carefully cut the opening in the deck so that the deck material can be
used as the hatch. Follow the kit instructions, and finish the hull.
 |
 |
Left: To install the S-280 motor, some of the formers must be
modified. A simple cutout that matches the diameter of the motor is all
that’s needed to securely attach the motor.
Right: Adding the stuffing box and prop shaft is a simple matter of
cutting the keel at the proper angle; then epoxy the parts together. |
|
